My DIY Kindle Wall Display
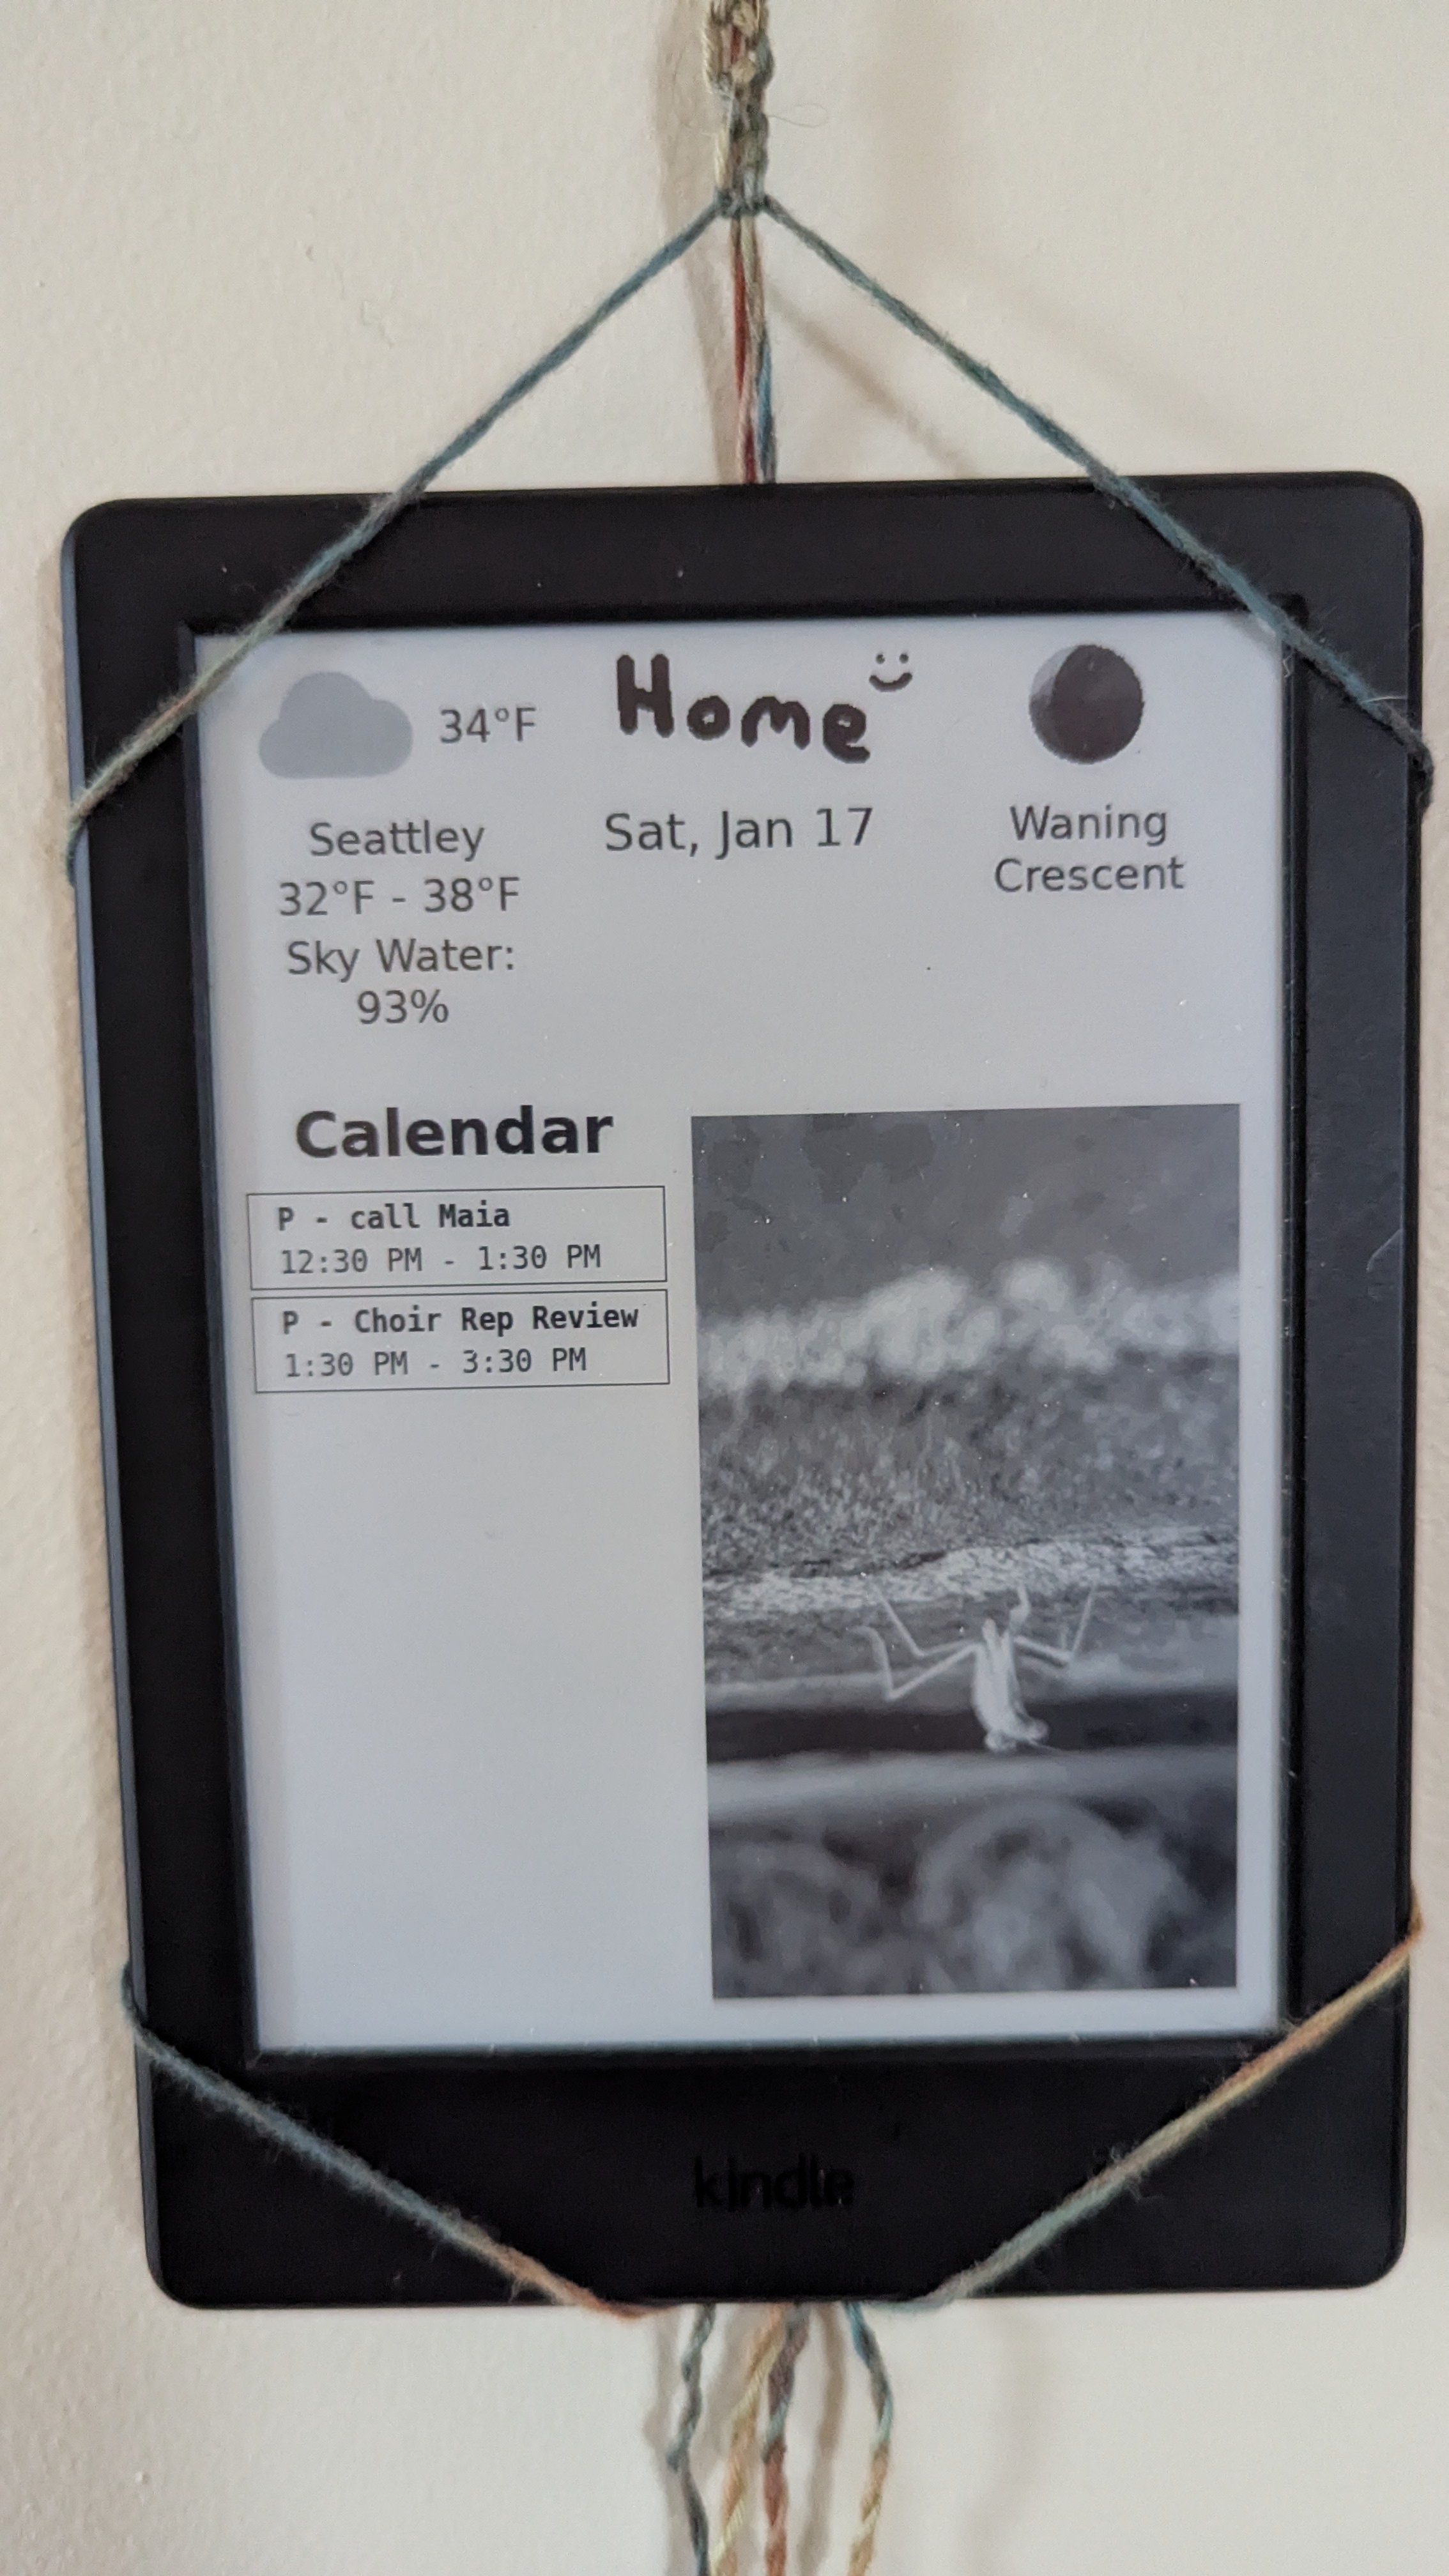
Version 1.0 of my Kindle Wall Display is completed and hanging on my wall!
It’s been a bit of a saga to get it done, so I’m writing this here blog post to document it all.
First off: what even is it?

My display is made out a jailbroken e-reader (specifically a 2016 “Kindle Basic 2”), where every 15 minutes it updates the screen with:
- the current weather and rain forecast
- the moon phase
- my partner and I’s shared calendar
- a daily random photo
It’s hanging, un-plugged-in, from a command hook on our kitchen wall. Although it’s only been running for a week, I think it’ll last for around 30 days before needing to be charged.
While I’ll probably end up tweaking the display over time, I’m pretty happy with it so far, and it solves the problem of me never looking at my calendar 😅
Ok, secondly: why even is it?
I’ve been wanting to build one of these for a while now. I think I first got the idea from Matt Healey’s blog post: “Your next smart home device is a $30 used Kindle”.
The quote from Naveen that he shared really spoke to me:
What if we didn’t have to / weren’t meant to carry our technology with us as we moved around town?
What if the technology was actually already in the room when we got there?
Many of my projects over the last year, the NFC tag stuff especially, have been focused around bridging the divide between the digital and the physical.
It always feels magical to me to have this physical totem that can interact with the digital world in some way, be it by playing music, opening a website, or showing off your Pokemon:
Making my own digital wall display that I have full control over (it can show what I want, it doesn’t need a crappy app that steals my data, etc etc) feels like magic in just the same way.
It’s been nice waking up in the morning, walking to the kitchen to feed the cats, and seeing our calendar and its random photo waiting for me. Much more calming on the nervous system than checking my phone!
Additionally, I like the idea of repurposing old technology that would otherwise just be tossed in a landfill somewhere.
We live in a world where disposable vapes have enough tech in them to host a website. I want to see us using the tech around us instead of everybody feeling like they’ve got to spend a gazillion dollars on the hottest new Mac-whatever.
Finally, I’ve always liked eink displays. I find them much more soothing than normal computer screens. I can read books on my Kindle for hours without eyestrain, whereas I start to feel it after only half an hour on my laptop.
Unfortunately, eink displays are still both expensive to buy standalone and finicky to hook up to a computer like a Raspberry Pi. I think this might be starting to change, with grocery stores around the world using eink to display prices, production of eink screens has ramped up.
But even still, a new 6inch-ish eink display can cost somewhere around $70USD (example), and that’s just for the screen – there’s no onboard linux computer, no wifi capabilities, no touch screen, no buttons, etc etc.
Whereas you can buy a used Kindle with all of those features and more for like $30USD!
The big downside of using a Kindle is that Amazon has tried their hardest to restrict your access to your own device. If you want to do anything other than read Amazon-formatted ebooks on it, you’re going to have to do some pretty technical stuff.
Fortunately, there’s a large community of kindle hackers out there that’ve made a bunch of tools to make this easier – I couldn’t have done it without their years of hard work. Fuck off Amazon, but fuck yeah http://mobileread.com/.
Ok, with all that said, I’ll go over how I made this! My goal here is just to document everything I did (including the failed approaches) so that I, and maybe even others, can recreate it in the future.
Getting the kindle to do what I wanted was a trick and a half, so anything I can do to spare myself and others the pain in the future feels worth it!
Gritty technical details ho!
Prior Work
In working on this project, I scoured the web for writeups from people who’ve done similar. Their blog posts were incredibly helpful, and without them I don’t think I would’ve gotten this done.
I’d like to thank:
Matt Healey (https://matthealy.com/kindle) for my original inspiration and his cronjob approach, my v1, which didn’t quite work out battery-life wise, but got me started!
Anselm Köhler, whose Avakindle project showed up multiple times in my searching. While I didn’t end up using his approach, his project is badass and I hope its still out there, keeping people safe from avalanches!
Pascal Widdershoven’s who made the Kindle Dash project. I stole his wait-for-wifi script, and reading his code helped me understand a lot more about kindle’s
lab126framework. Unfortunately, some of his techniques don’t work on my model of kindle, but it was a great starting point (and I ended up getting pretty close to it in v3).yparitcher’s kindle-zmanim project, which taught me a key technique (
lipc-wait-event) which let me improve my battery life significantly in v2. I was pulling my hair out before I found this, so thank you!This thread on MobileRead where several contributors worked together to figure out how to use the kindle’s RTC system to wake the kindle up from suspension. This is the final trick I needed to get my current working v3 code.
Finally, this project literally would not have been possible without all of NiLuJe’s hacks over on mobileread. He made the kindle plugin manager KUAL, and his plugin USBNetwork makes it so much nicer to develop on kindles by letting you connect to them over SSH. Thank you!!!
System Overview
The TL;DR is that I have a single-board computer (a OrangePi Zero) that fetches all the information I want to display on the Kindle (calendar, weather, etc), turns it into an image, and then the kindle calls the OrangePi to get the image and displays it every 15 minutes.
Diagram Code
Kindle->Kindle: after 15 minutes, wake up from suspend mode
Kindle->WebServer: http request for a dashboard image to display
WebServer->APIs: fetch info (calendar, weather, etc)
WebServer->WebServer: create greyscale dashboard image
WebServer->Kindle: respond with dashboard image
Kindle->Kindle: display the new image
Kindle->Kindle: suspends itself
This isn’t the only way to architect a wall display like this, but after a fair bit of tinkering it’s what worked best for me.
The WebServer is hosted on an Orange Pi Zero 3 single board computer that’s plugged in to my router.
I had originally tried to have the kindle do everything, no OrangePi computer required, but it turns out that kindles are pretty resource constrained and having the wifi on a lot drains the battery something fierce, so I ended up pivoting.
There were a lot of tricky implementation details in building this system which I’ll go over below!
The Kindle Side of Things
This was by far the hardest part of the project for me.
You have to jailbreak your kindle in order to get started, and then once you have the ability to execute code on your device, you have to deal with the fact that different kindle versions have pretty different capabilities.
What little documentation exists is pieced together by the hackers over at the MobileRead forums, or the writeups from other people who’ve made dashboards, and I had a hell of a time piecing it all together.
That said, after the days of bashing my head against the wall, the resulting code to call my webserver and display the resulting image was fairly simple!
My code was written for my Kindle Basic 2 (2016), which is assigned the nickname KT3 by the MobileRead community.
You can figure out the nickname for your own kindle on this MobileRead page – you’ll need to refer to this nickname to jailbreak your kindle, set up your dev environment, and look up any documentation if my code doesn’t work on your device.
If you already have a jailbroken kindle, and just want to jump straight to the working code, click here.
Otherwise, let’s talk about jailbreaking and setting your kindle up for development.
Jailbreaking
Amazon and the kindle developers do their damndest to make sure you can’t use the device you paid for in ways they disapprove of.
They lock it down so you can’t do anything with it other than reading Amazon-formatted ebooks, and even then you have to pay to turn off the ads they inject into your screensaver.
Fortunately, a bunch of hackers have come up with clever ways to give you your device back: a process called jailbreaking.
There’s a constant cat-and-mouse game between kindle hackers and Amazon around jailbreaking. At time of writing, there’s two ways to jailbreak newer kindles: AdBreak and WinterBreak, both of which are detailed at https://kindlemodding.org/jailbreaking/index.html.
I used LanguageBreak, which only works on older kindles.
You may have to do some digging to find a method that works for you. Be sure to follow the instructions carefully, as some of these jailbreaks have the potential to brick your device if you do it wrong.
But once you’ve done it, your kindle is freeeeee!
There’s plenty of reasons to jailbreak your kindle beyond making a wall display. Dammit Jeff on Youtube has a great video talking about them:
I make use KoReader myself, and take great pleasure in sending books to my kindle via SSH over wifi using the USBNetwork Hack.
Speaking of, let’s talk about setting things up so you can push code to your kindle.
Making a good Kindle dev environment
The kindle hacking community has made a few very useful pieces of software that make it much easier to develop code for kindles.
The first two you should install are: KUAL (Kindle Unified Application Launcher) and MRPI (MobileRead Package Installer).
KUAL & MRPI
KUAL is an application launcher, which acts as a homebase/general settings page for all the other community made software you might want to install on your Kindle. It adds a special “book” to your library page, which, when clicked, opens a page with all of your installed applications.
MRPI is a KUAL application that makes it easier to install other applications. With MRPI installed, all you need to do is drop a new KUAL application in a specific folder on your kindle’s harddrive, open KUAL, hit install, and MRPI will take care of the rest.
You can find both programs on this page: https://www.mobileread.com/forums/showthread.php?t=225030. Take note of your kindle nickname and make sure you’re downloading the correct versions.
The packages are bundled as tar files, and include READMEs inside them explaining how to install them. If you’re running into trouble, this kindlemodding page may help.
USBNetwork Hack
The final plugin we’ll need is the USBNetwork Hack, which allows you to connect to your kindle over SSH.
You can download it from the same page as the other two: you may have noticed that they were all made by the esteemable MobileRead user NiLuJe, who I can’t thank enough.
I did have a bit of trouble with the USBNetwork Hack myself, specifically with getting SSH to work over WIFI. It worked very inconsistently and I had to keep restarting my kindle to re-enable access. I ended up giving up on WIFI and just SSH’d to my kindle when it was plugged in to my computer, which consistently worked.
I found this walkthrough by ZZ & Joa to be super helpful with getting it setup – their instructions for MacOS worked perfectly.
If you can’t get it to work at all, you may be able to just telnet to your kindle without USBNetwork Hack, but it will depend on your kindle version.
With your kindle jailbroken and these plugins installed, you should now be able to SSH into your kindle and run whatever code you’d like.
So let’s talk about writing the script that’s going to fetch and display the dashboard image.
Kindle Dashboard Bash Script
Again, the goal here is to have some code that fetches and displays an image from my webserver on some standard interval.
I didn’t want to keep the kindle plugged in to a charger all the time, since it would damage the battery (and look bad on my wall). (I also liked the idea of being able to just take it down and read a book on it, even though I’ll probably never actually do that…)
This means that we need to conserve battery life as much as possible, which means limiting WIFI use, turning off unnecessary services, and putting the kindle in suspend mode when not fetching new images.
The full script I used is as follows. Don’t worry about understanding it all, I’ll break down the different techniques I’m using below.
log() {
    echo "[$(date)] $1"
}

fetch_and_display() {
    log "updating image"
    sh /mnt/us/kindledisplay/wait_for_wifi.sh

    curl $WEBSERVER_URL -o /mnt/us/kindledisplay/image.png

    log "turning off wifi"
    lipc-set-prop com.lab126.cmd wirelessEnable 0

    eips -fc
    eips -fg /mnt/us/kindledisplay/image.png
}

log "starting script_v3"

log "stopping gui"
stop lab126_gui

while true
do

fetch_and_display

log "writing +900 to rtc0 wakealarm"
echo 0 > /sys/class/rtc/rtc0/wakealarm
echo "+900" > /sys/class/rtc/rtc0/wakealarm

log "suspend CPU to memory"
echo "mem" > /sys/power/state

log "waking up"

done;It took me several iterations to get to this code, and I suspect that it might only work on older versions of the Kindle firmware.
Below I’ll go over all the different approaches I tried, give you a different version of the script with slightly worse battery life that will probably work on more kindle versions, and explain how the final approach works!
Version 1: Cronjob
The first thing I tried was the approach laid out by Matt Healy, of just using a cronjob to run a script on an interval.
The script looked something like this:
curl $WEBSERVER_URL -o image.png
eips -cf
eips -gf image.pngThe eips command is a kindle built-in command that can
display text or images to the screen.
eips -cf clears the screen, with the
-f flag marking a “full” clear – it turns every pixel white
rather than trying to do a clever “partial” clear, which can result in a
screen burn-in effect.
eips -gf is the command to draw the newly downloaded
image, once again using the -f flag to make sure that the
image is as crisp as possible.
Finally, you need to make a crontab entry that runs this script every N minutes.
Edit the /etc/crontab/root file and add a line to the
bottom like:
*/15 * * * * /mnt/us/script_v1.shThis approach works well and is dead simple. The cronjob scheduling remains even if the kindle is restarted; the whole thing Just Works™.
The big downside though is that it drains battery like crazy. After ~10 minutes of inactivity, kindles automatically put themselves into “suspend mode”, which basically shuts off the CPU until you tap the screen again.
When the kindle’s in suspend mode, it can’t run cronjobs, and your image never updates.
You can prevent suspension with code (which I never attempted), but this knocks your battery life down from order of weeks to something like two hours.
To fix that you could keep the kindle plugged in all the time (which also keeps it from entering suspend mode), but that’ll slowly kill your battery over time.
I wanted a different approach, because I want my device to work for as long as possible, and to maybe even read books on it if my other kindle ever breaks.
So I needed to find a different approach, one that puts the kindle into suspension in between image updates.
Version 2: Listening to Kindle LIPC events and rtcWakeup
After about a week of tinkering I managed to come up with a solution that actually keeps the kindle in suspend mode most of the time – which gave my dashboard an effective battery life of two weeks!
In fact, the following code is what I’ve had running on my Kindle for the last two weeks, including the entire time I’ve been writing this very blog post! It was only during this writing process that I discovered a slight better approach, which I’ll detail in Version 3.
I think this Version 2 script is more likely to work out-of-the-box on more versions of the kindle firmware, so if you’re having trouble with Version 3, give this one a try – it’s only a little bit worse battery wise.
Without further ado!
# utils
log() {
    echo "[$(date)] $1"
}

fetch_and_display() {
    log "updating image"
    sh /mnt/us/kindledisplay/wait_for_wifi.sh

    curl $WEBSERVER_URL -o /mnt/us/kindledisplay/image.png

    log "turning off wifi"
    lipc-set-prop com.lab126.cmd wirelessEnable 0

    eips -fc
    eips -fg /mnt/us/kindledisplay/image.png
}

# main body of the script

log "starting script.sh"

echo powersave > /sys/devices/system/cpu/cpu0/cpufreq/scaling_governor
stop lab126_gui

fetch_and_display

lipc-wait-event -m com.lab126.powerd goingToScreenSaver,wakeupFromSuspend,readyToSuspend | while read event; do
    case "$event" in
        goingToScreenSaver*)
            log "intercepting screensaver and replacing with image"
            fetch_and_display
            ;;
        wakeupFromSuspend*)
            fetch_and_display
            ;;
        readyToSuspend*)
            lipc-set-prop -i com.lab126.powerd rtcWakeup 1800
            ;;
    esac
done;test_ip=$WEBSERVER_URL
log() {
echo "[$(date -u)] $1"
}
restart_wifi() {
# Turn WiFi off and on
lipc-set-prop com.lab126.cmd wirelessEnable 0
sleep 5
log "WiFi turned off"
lipc-set-prop com.lab126.cmd wirelessEnable 1
sleep 5 # Give it time to reconnect
log "WiFi turned on"
}
wait_for_wifi() {
# Try 5 times, then restart WiFi, then try 5 more times
counter=0
ping -c 1 "$test_ip" >/dev/null 2>&1
while [ $? -ne 0 ]; do
counter=$((counter + 1))
if [ $counter -eq 5 ]; then
log "Retry $counter, restarting WiFi"
restart_wifi
elif [ $counter -eq 10 ]; then
log "Retry $counter, couldn't connect to Wi-Fi" && exit 1
fi
sleep 5
ping -c 1 "$test_ip" >/dev/null 2>&1
done
}
log "turning on wifi"
lipc-set-prop com.lab126.cmd wirelessEnable 1
log "sleeping for 5"
sleep 5
wait_for_wifi
log "Wi-Fi connected"My script, and the use of lipc-wait-event, is heavily
inspired by yparitcher’s kindle-zmanim
project.
The kindle OS has a custom bus system called LIPC which is used to pass data and events between different kindle services.
One of those services automatically turns the kindle screensaver on after a ten minutes of inactivity. After one minute of screensaver mode, the service then put the kindle CPU into suspend mode.
When it does these state changes, it fires events on the LIPC bus
which we can listen to using the lipc-wait-event command,
triggering our fetch_and_display code when appropriate.
We listen for the goingToScreenSaver event, fired when
the kindle is going to go into screensaver mode, and fetch and display
the image instead of the screensaver.
Then, right before the kindle goes into suspension, it fires a
readyToSuspend event. We can listen to that event
and set an RTC wakeup timer for 15 minutes in the future.
When the timer goes off, the kindle wakes up, and fires a
wakeupFromSuspend event, which triggers our code to refetch
and display an updated image.
And so it goes, until the kindle runs out of battery!
The lipc-set-prop -i com.lab126.powerd rtcWakeup 1800
line is what sets the wakeup timer. lipc-set-prop is the
command to set kindle-wide properties that all of the internal
lab126 services can read.
In this case, when com.lab126.powerd.rtcWakeup is set to
some N seconds, some internal kindle services configures the underlying
RTC system to wakeup N seconds later (note, you can only set the
rtcWakeup property when the kindle is in
readyToSuspend mode, you’ll get an error otherwise).
Now, there’s one flaw with this whole architecture: we don’t actually put the kindle into suspend mode ourselves, we’re relying on the kindle’s internal processes to do this.
From my testing, my kindle will automatically go to into suspend mode after one minute of uninterrupted time in screensaver mode, which means that the kindle’s CPU is running, draining the battery, for that time.
A minute might not seem that much, but when the
fetch_and_display function takes less than five seconds
(most of that waiting for the wifi to reconnect), another 60 seconds is
huge!
Can we do better?
Version 3: Setting suspend mode and the rtc wakeup timer directly
Like I said above, it was only while writing this blog post that I found a forum thread detailing a different approach that would let me set the kindle into suspension myself, instead of waiting for the internal kindle systems to do it.
I’m really peeved that it took me so much sleuthing to find this! The
kindle-dash project
uses a similar approach, but it uses a file
/sys/devices/platform/mxc_rtc.0/wakeup_enable to set the
wakeup timer, and that device doesn’t exist on my kindle.
I assumed then that this approach wasn’t possible at all on my
firmware, and when I found lipc-wait-event I figured that
was the best I could do.
As I learned more about RTC though, I realized there was probably some way to set it manually, given that the kindle was doing it itself somehow and then I found the forum thread above!
The new script is:
# same as above
log() {
    echo "[$(date)] $1"
}

# same as above
fetch_and_display() {
    log "updating image"
    sh /mnt/us/kindledisplay/wait_for_wifi.sh

    curl $WEBSERVER_URL -o /mnt/us/kindledisplay/image.png

    log "turning off wifi"
    lipc-set-prop com.lab126.cmd wirelessEnable 0

    eips -fc
    eips -fg /mnt/us/kindledisplay/image.png
}

log "starting script_v3"

log "stopping gui"
stop lab126_gui

# this bit's new
while true
do

fetch_and_display

log "writing +900 to rtc0 wakealarm"
echo 0 > /sys/class/rtc/rtc0/wakealarm
echo "+900" > /sys/class/rtc/rtc0/wakealarm

log "suspend CPU to memory"
echo "mem" > /sys/power/state

log "waking up"

done;(wait_for_wifi.sh is the same)
My kindle model (KT3) apparently has two different RTC devices
(rtc0 and rtc1), which you can find at
/sys/class/rtc/. It seems like I could use either but I’ll
report back if I run into any issues with hardcoding
rtc0.
The echo "+900" > /sys/class/rtc/rtc0/wakealarm is
the magic that sets an RTC alarm to wakeup the CPU in 900 seconds.
I have no idea how the “+900” syntax works. It results in a unix
timestamp 900s in the future being written to the wakealarm
file, like so:
[root@kindle kindledisplay]# cat /sys/class/rtc/rtc0/wakealarm
[root@kindle kindledisplay]# echo "+1800" > /sys/class/rtc/rtc0/wakealarm
[root@kindle kindledisplay]# cat /sys/class/rtc/rtc0/wakealarm
1770066717If anybody knows why this “+” syntax works, let me know!
The next critical line is
echo "mem" > /sys/power/state, which is what puts the
kindle into suspension.
According to this Linux kernel doc, what the “mem” string means might differ from system to system.
It seems
like the meaning of the “mem” string is configured in the
/sys/power/state/mem_sleep file – but my kindle doesn’t
have that file set, which means it’s doing some default behavior that I
can’t find the configuration for.
I read the kernel messages (using dmesg) when setting
/sys/power/state to both “mem” and “standby” and they were
identical (except for a line mentioning “preparing system for
{mem|standby} sleep”) so I’m assuming “standby” is the default.
Additionally, I looked out the dmesg logs of when the
kindle puts itself in suspend mode, and it logs that it’s “entering mem
sleep”, so at the very least, I’m doing the same thing that the kindle
itself does.
Anyway, when the /sys/power/state file is written to,
the kindle immediately starts to shut down user services – which means
that SSH will stop, so be careful when you do this! The power button
still works in suspend mode, so you can always restart the kindle if you
need to.
After the 900 seconds are elapsed, the RTC system wakes up the
kindle, and the process running our script resumes, running the
log "waking up" line, and then going back to the top of the
while loop to start the whole process again.
Therefore, compared with Version 2, we’re controlling the suspension directly, and can save the one minute per loop where the kindle is waiting to be suspended.
This in turn appears to double my battery life. It’s only been running for a few days, so I can’t tell for sure, but if the battery drains at a constant rate it should last for around 34 days, instead of the prior 15 :)
One last thing to note is that you can’t easily interrupt this
script. Plugging the kindle in (or hitting the power button) will
automatically wake up the kindle – but then the while loop
will continue and immediately put it back to sleep. You have to reboot
the kindle entirely to kill the script.
You could give yourself a bit of time to kill the script by running
sleep 10 before you echo "mem", but that’s
more seconds that the kindle isn’t in suspend mode, so I figure it’s ok
to have to manually restart the kindle (and the script) every now and
again.
Tips and Tricks
Here’s some more things I came across while researching this that I didn’t end up using, but think are worth mentioning.
Starting a script on boot
If you want a script to start everytime you reboot the kindle, you
can create a configuration file in /etc/upstart, for
example:
start on started lab126_gui
# This line tells init.d where in the boot process to start this script. Good
# places are "start on started framework" if you need it to run after the
# framework daemon is running. "start on started lab126_gui" tells it to run
# after the ui is up. That is the final phase of the boot process.

stop on stopping lab126_gui
# This tells the system when in the shutdown process to kill your script. If
# you are just running a single command, this isn't terribly important.

script
    # exec /bin/sh /your/script/here.sh
    exec /bin/bash /var/local/dev/somescript.sh
end scriptAs the forum poster says, be careful with this, because if your script borks during boot it could brick the kindle.
In one iteration of this project I had an upstart config, but it’s not a good idea to do it now that my script immediately suspends the kindle. If I ran my script on boot, I’d never be able to SSH into the kindle to kill the script – I’d effectively have bricked it to be a dashboard forever more! So, use with caution.
Reenabling wifi when your internet dies
Right now my script will stop working if the internet cuts out. This happens pretty rarely where I live, so I haven’t written any code to try and mitigate it, but something to be aware of if your internet is less stable.
_nico’s script here has a bunch of logic that I think might help with this, give it a look if you’re running into this.
The WebServer
The WebServer is responsible for fetching all the information I want to display on the kindle, turning it into an image, and responding to requests from the kindle.
The full architecture for this part looks like this:
Diagram Code
Kindle->WebServer: send request for new image
WebServer->CalendarAPI: what’s happening today?
CalendarAPI->WebServer: list of calendar events
WebServer->WeatherAPI: what’s the current weather?
WeatherAPI->WebServer: fucking freezing!
WebServer->WebServer: Calculate current moon phase
WebServer->WebServer: Choose random daily image
WebServer->WebServer: Make an HTML page using all the info above
WebServer->WebServer: Use Playwright to a screenshot of that HTML page
OrangePi->OrangePi: Use Imagemagick to convert the screenshot to greyscale
OrangePi->Kindle: respond with the image
I chose to have my webserver running on a computer inside my home, but you could do it on a VPS or a Neocities site, or a cloud platform – you just need to make sure it’s private (e.g. you could password protect it with HTTP Basic Authentication).
Notes on setting up the OrangePI SBC
The OrangePI is running inside my local network, plugged directly into my router over ethernet. OrangePIs do have WiFi built-in, so you don’t necessarily need to have it next to the router, but plugging it in meant that I never had to worry about connectivity issues.
The computer is not exposed to the public internet, it’s only accessible over the local network. Since the kindle also never leaves the house, that works fine, and it means I don’t have to worry much about security. If somebody inside my home wants to mess with my kindle, well, I hope they don’t also steal my bankbox 😅
I use SSH to communicate with the OrangePi from my laptop. I use Git to push code from my development machine (my laptop) to the OrangePI.
I was too lazy to set up any sort of automated service restarter –
when I git push I then ssh into the orangepi, manually kill
the existing webserver process, and run it again. If I wanted to be less
lazy, I could write-up a systemd service for
the webserver which would allow me to easily restart it, and then have a
git
post-receive hook restart the service on push. Work for future
me!
The webserver code
I used Nodejs to both generate the image and respond to incoming http requests, just because it’s what I’m most comfortable with.
There’s nothing fancy here: I’m using express as my webserver framework, and I generate the image afresh on every request.
Only thing of note is that I have two routes: / which
serves the image, and /html which serves the HTML version
of the image, which was really nice for debugging.
Fetching all the API info
I use two APIs to gather the info I wanted to display on my kindle: https://open-meteo.com/ for the weather, Google Calendar for my partner and I’s shared calendar. I then have a hardcoded list (through 2027) of moonphases by date which I read to get the moonphase.
open-meteo
open-meteo is free and easy-to-use. It gives you lots of different types of weather info that you can query (like wind speed and relative humidity), but I’m only fetching the current temperature, the daily min/max, the daily chance of precipitation, and the current weather (represented with a WMO code).
I did have to make one more hardcoded list to map the WMO codes to English descriptions (e.g. Mostly Clear, Snow, Seattle-y) and weather icons.
Google Calendar
Fetching my personal Google Calendar was the biggest pain in the ass. You can’t use the normal Google Calendar API to fetch shared calendars, even ones you own, so I had to make a Google cloud User-managed service account, share the calendar with that account, and generate an API key (with Google Calendar scoped permission) for the account.
Armed with your new service account API key, you can now use the Google Calendar API. But you can’t just use the API key directly, no way.
You have to take that API key, turn it into a JSON web token, pass that web token to another endpoint to get an OAuth token. Finally you use that OAuth token to make the API request – though it’s possible for the token to be expired or revoked, so you have to implement retry logic for expired tokens.

For the record, this kind of over-engineered process that maybe makes sense for a organization using Google Calendar but certainly not for an individual is exactly how all Google products are designed, both internally and externally. Reason #4723 to try an degoogle my life…
Creating the image
When the kindle hits the / endpoint, the express
framework receives the request, calls the APIs above, and used them to
make a 600x800px HTTP page with all the updated info. Different kindles
have different dimensions, so be sure to check yours.
Some projects I saw leave a bit of space for the default kindle status bar (with the time and battery and all that), but I turn off the Kindle system GUI to conserve battery, so my dashboard image just takes up the entire space.
I then use the testing library Playwright to load the generated HTML page in a headless version of Chrome and take a screenshot of it.
I then use ImageMagick to convert that screenshot to the correct kind of greyscale PNG that the kindle knows how to draw.
This may seem a bit convoluted, but I’m more comfortable with writing HTML pages than I am with any other graphics library, so this is what worked for me. If you think it’d be easier to skip the HTML step and just build the image directly, more power to you!
Here’s some choice snippets of code:
Generating the HTML page
Not much to say here: I use Javascript’s template literals to fill in a HTML template with the API.
Only thing worth noting is that because the size of the display is always constant (600x800px) you can do all the non-responsive CSS things (like using pixel units) which is nice.
That said, the calendar entries are dynamic, so I had to make sure the layout worked with different amounts of events. When there’s few events, the layout changes to render a landscape image below the calendar, to try and use all the available space:

Taking a screenshot with Playwright
Playwright does all the work for you here – it just has a nice and
easy screenshot function!
Only thing to note is that you have to apt-get chromium
(or firefox) on the machine you’re running this code from – another
reason to do this on a separate device and not use the kindle to
generate the image.
const { chromium } = require('playwright');  // Can also use 'firefox'.

const browser = await chromium.launch();

const context = await browser.newContext(
    // make sure to use your kindle's dimensions here
    { viewport: { width: 600, height: 800 } }
);

const page = await context.newPage();

// this function calls the APIs and makes the HTML page
const htmlPath = await generateHTMLFile();

await page.goto(`file://${htmlPath}`);

// this is the magic
await page.screenshot({ path: '/tmp/screenshot.png' });

await browser.close();Converting the screenshot to the kindle’s preferred format
Kindles can draw PNGs that are “PNG8s”, that is where every pixel is represented with 8 bits. 8 bits means that these PNGs can only have 256 (2^8) colors – though since the Kindle can only display shades of grey (along with other erotic novels), we won’t be using all 256.
I believe if you ask the kindle to draw a non-greyscale image, it’ll convert it for you, but I figured I’d save it the trouble and do it myself when I’m processing the image.
The ImageMagick command to convert images (in my case, JPGs taken by my phone) to 8 bit greyscale PNGs is:
convert -colorspace gray -depth 8 filename;And that’s the long and short of it for the webserver! I’ll probably make some tweaks in the future, maybe add an air quality API, but this is working well enough for now!
Macramé
Many of the kindle projects out there use 3D printed display cases to mount the kindle to the wall, or just prop it up on a desk.
I decided to go another way and make a little macramé holder to hang it from the wall!
I had never done this before, so went to Youtube to find tutorials. I ended up following this one:
It was a bit of a pain to follow, and the music is hella annoying, but it worked!
I used a transparent command hook to give the macramé something to loop around. It’s been hanging for two weeks now with no issues, so I’m pretty happy with it!
I just used some yarn that we had lying around, and I think it’s a bit too thin to get the nice knotted look that a lot of macramés have, so I may look for a thicker yarn in the future.
It felt pretty magic to be able to make a secure wall hanging out of a bit of string, makes me want to do more macramé!
Well, that’s all I got! If you read this far, thanks for putting up with my verboseness, and I hope you make a kindle dashboard of your own! If you run into any trouble, I’m happy to help debug, just shoot me an email.
Thanks again to all the cool people out there making projects like this and writing them up to inspire others. Couldn’t have done it without you!